Once you find any item you can make as many copies of it as you want.
In case anyone was wondering, The `Wizard in Red' refers to Dracandros. He is the owner of the Crescent Moon bond. The `Woman in Green' refers to the leader of the Cultists of Moander. They, of course, are the owners of the Mouth in the Hand bond, which is the symbol of the God Moander. The `Lord of the Black' refers to the leader of the Zhentrim, or `Black Network', an evil alliance of priests, mages and thieves that operate out of Zhentil Keep. They own the big `Z' in the Triangle bond. Lastly, `The Flamed One' is, of course, good old Tyranthraxus. He owns the Flaming Bond, which is the Symbol of Tyranthraxus.
To defeat Tyranthraxus, you must gather the Amulet of Lathander, which is in Zhentil Keep, the Helm of Dragons, which is currently being kept by Dracandros in his castle near Haptooth, and the Gauntlet of Moander, which is kept by Mogion (the Woman in Green!) in Yulash. You must take these items to the Pool of Radiance.
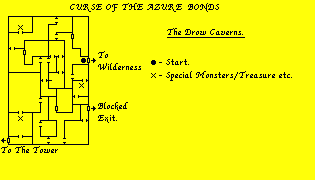
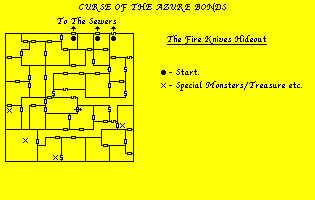





The first thing you should do after creating your characters is to go to the armoury and the general store. Get your characters equipped as best as possible. Also visit the High priest of the temple of Gond and the Sage Filani. Also go to the tavern, wait there having drinks etc.. until the tavern keeper asks you to leave. Leave, go to the side entrance, then got to the front and enter the tavern again. To explain what just happened, Princess Nacacia just got abushed by the Fire Knives as she tried to enter the tavern. Stay in the tavern if you need some info. Go to the Inn (where u start) and rest, Memorise spells etc.. If you transfered Pools of Radiance or Hillsfar Characters then first get them to train, in the hall. Now you will soon be starting the chase for the Fire Knives. Go North, and head west just after the general store and you should automatically get into a fight with the purple guard. While you were fighting, The fire knives have nicked Giogi Wyvernspur from The carriage. After you defeat the guards (Its your first fight, You DID defeat them didnt you?), Either surrender or run down the nearest alley. The Thieves Guild will send someone to get you out. The guild master gives you a sewers map and the Fire Knives attack. Kill them off and head south to the sewers. You should go to the vault on this level because it contains quite a few magical items as well as some coins. (I've also done maps for the game and they can be found in another archive. They aren't nessecary to complete it, but they do show the important places in each dungeon saving you from going everywhere.). Go South through the sewers and youl come across three seperate exits in the southernmost end wall. Two are normal doors, One is a secret door. There is also a secret Training Hall somewhere is the South East of the sewers. After exiting the sewers There are only a few places to go that are of any real interest. One is the armoury in south, as there are a few Magic Items here. However the most interetsting place is the South West corner where you get your bond removed and meet Nacacia, Azoun, Vandergahast and last and least Giogi. Before this however, you should rescue The Cleric, Gharri, from the torture chamber. After having your bond removed go to the standing stone. This is where you should always go when you have a bond removed because the man there (Tyranthraxus) tells you who to kill off next and where they are. He does this so he has full control of you for himself. At this time he should say "Seek Red to the South.". He means the Renegade Red wizard of Thay, Dracandros.
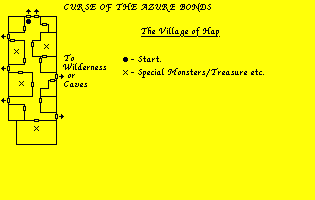
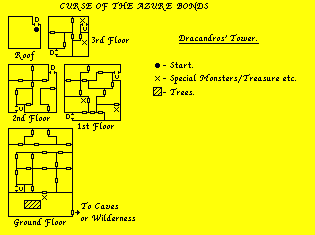
Go south till you reach the village of Hap. Your first task in removing the bond is to free the village. This is quite easy and should pose to much of a problem. The village has been taken over by an efreet and his Drow minions. You will find help in the inn in the form of one Akabar El Akesh. He is a mage of some very small level and is almost, but not exactly, useless. If you go into the south building immediately you will be severly wasted. If however you kill of some drow patrols first, then the Efreets forces will be severly reduced and easy pickings. After obliterating the efreet go to the caves. Go South East when you enter the caves and as long as you have a female member in your party, you will meet Silk of the swan mays. She will give the 1st Female in the party the mark of a swanmay and will ask you to do something for her. Go to the sulphur baths and get the chests from them. There are several magic Items in them including a Longsword +2 Dragon slayer which will help I you decide to kill of the dragons. Exit the caves via the dracolich. If you need XP, then kill him, Otherwise leave Crimshank alone. When you enter the tower you will meet dracandros. He will teleport you to the top of the tower where a host of evil black dragons are waiting. They force him to remove the bond. You now have to choices. Attack the dragons, and be passive. If you attack the dragons you had better hope you can kill them, but if you do you get quite a few XP and get the stuff that Silk wants. You should now head slowly down the tower. On the third floor there is a drow lord. Save your game before finding him because he is sometimes hard, sometimes easy to kill. On the 3rd floor theres a dragons egg which Silk also wants. There are a lot of wyverns hanging around in the tower and unless the party is relatively strong it may be an idea to avoid the rooms theyre in. In the tower somewhere is a special place called the Test of The Sphere. In this test a character controls a sphere of annihalation and must, by concentrating on it, force it into an opposing mage. Your character doesn't have to be a mage, I did it with a ranger. If you win you get some magic Items. If you lose youre disintegrated permanent like. On the ground floor after leaving the tower you will be attacked by Dracandros himself. Destroy his forces and him and you are well rewarded. Dracandros has stacks of Magic on his corpse. Re-enter the caves if you killed the dragons and got the egg and Silk will give you some treasure. Unfortunately this isnt magical Though it will help if youre broke. Go back to Haptooth and id all magic and Rest/Fix/Memorise all chars and spells etc.. No go to the standing stone. Tyranthraxus says:Seek the woman in green to the NW. By This he means Mogion a cultist of moander who resides in moanders pit.
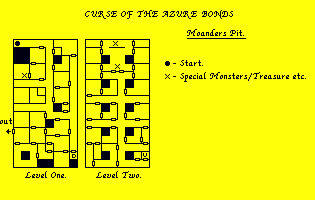
Go to and Enter Yulash. You should enter by asking permission. You will be taken to see the commander. Walk around the room until the spies try to escape kill them and you wont have to worry about the red plume guards in the check points. There are only two places you must go to in Yulash, The first is the middle of the city to get the wand of defoliation. and the secon is the North East to enter the pit of moander. Enter the pit and follow the sights and sounds of a recent battle. You will find Alias and DragonBait. Allow them to join and head for the stairs in the South East. Go down and go straight North take out the slug and the cultists and continue north till you reach a pair of doors. Enter and attack Mogion when you get a chance. After insuring the death of Mogion and her Cult you will be attacked by a parts of a God. Called "Bit'O'Moanders" they are reasonably easy to defeat, using spells like Stinking Cloud, and Hold Monster. Search the Altar for some treasure and leave the pit by the exit door on the first level. Now visit Tyranthraxus at the standing stone again and hell tell you to "Seek Black to the North.". The black lord is Fzoul Chembyrl, one of the higher members of the Zhentrim.
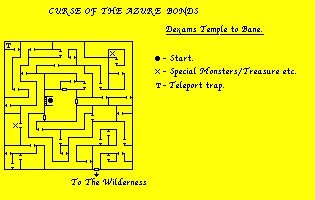
Go to and enter the city of Zhentil Keep. Here you may buy numerous Magic Items and various goods you may need to restock. Buy all you need and then follow the path around until you meet Olive Ruskettle, The halfling Bard. Follow her and enter the door in front of you when she leaves. You will find Dimswart the sage. Take him with you and make your way to the chapel. DONT follow the woman until you've searched the altar. One of the weapons you find there is cursed so be careful. Follow the Hooded Woman (Medusa) and she will take you to Dexam the Beholder. He will disintegrate Fzoul, removing your bond and leave. You must find and kill Dexam to get the amulet of lathander. He is in the South West Corner of His Temple with a few minotaurs and his Medusa. Another place of interest here is the dead elfs body which has a few items on it. Avoid the North East Corner because there is a trap there that teleports you to the dead elf causing you damage. For the last time go to the standing stone and Tyranthraxus reveals himself and goes to his temple in Myth Drannor.
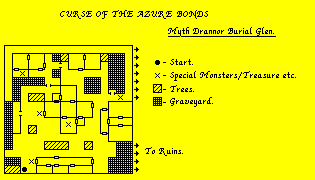
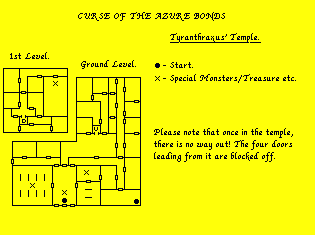
This is the last part of the game so make sure your characters are all max level or youll be slaughtered. In the Burial Glen fights with spiders can NOT be avoided however fights with Thri-Kreen can by parlaying and saying that Tyranthraxus is your master. Always Rebury the skeletons and replace the bones in crypts. There are five things which should happen before you continue. You should go to the Spirit Queen in the Tomb in the North West Corner and get the magic Items she gives you. You should follow and kill of the Red Plume soldier (who is really a Rakshasa.) and get his bow and arrows. You should meet The Nameless Bard (Finder Wyvernspur). You should kill the thri Kreen in their lair. And finally There are Knights of Myth Drannor wandering around. Dont enter the ruins without meeting them. To reach the ruins simply go east and enter the east forest. Follow the woods not the path. In the ruins there are only a few things to do. You should first save the guy running from the hell hounds and go and get his treasure. Next go visit the old Rakshasa and speak Haughtily to him and he'll offer his assisstance. Somewhere in the ruins a rakshasa is wandering around and asks you to help him raid the treasure room. Assisst and get the treasure. Go break up the gambling game in the North West as well. Note: Save frequently. If you encounter a patrol just give them dosh. Finally Enter the sewer grate located somewhere in the North West Quadrant. You will now find yourself in the temple. Head west until you find Tyranthraxus and then when he runs off go north and up the stairs. Now go to the North East and enter the South Door. You are now in the final battle with Tyranthraxus and his 12 High Priests and 48 Margoyles. The easiest way to kill him is to all be invisible with either the spell (Not very effective) or the Dust of Disappearance (infinitely Preferable). Once you have defeated him you will be teleported to Shadowdale where a feast will be held in your honour.
Congratulations you have completed Curse of the Azure Bonds!